Caravan Level Indicator
This project started as a means to be able to get a more accurate and reproducible level easily visible from out side the caravan, in both daylight and after dark.
The project turned out to be fairly easy and produced much better results than anticipated. The only part which might prove difficult to source is the brass bob weight. I turned this up on my lathe from solid brass rod, to suite the purpose, though you might be able to find alternative parts to produce the same result. The critical thing is that it should hang perfectly straight.
There are two modules to the project, the sensor and the display.
The sensor
The sensor is simply a brass bob weight, suspended via a thin copper wire inside a short length (about 12") of plastic drain pipe making contact with any two of four brass screws - the ends of which are ground to a sharp point. This module is installed wherever it can be fitted rigidly and not be disturbed once calibrated. I fitted mine under a front under bed locker between floor and the underside of bed's timber frame.
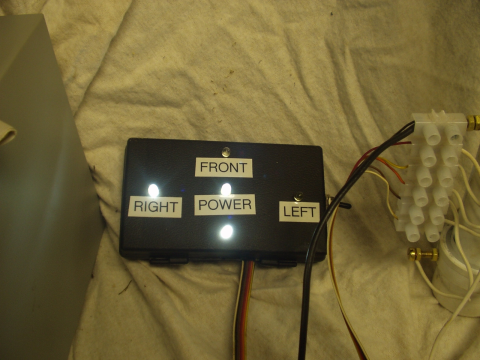
The sensor is linked to a small plastic box providing a display of five LED's. This part is not fixed, but just put in the caravan's front window when it is needed. When not needed it can be stowed out of the way inside (in my case) the front under bed locker.
Building the sensor...
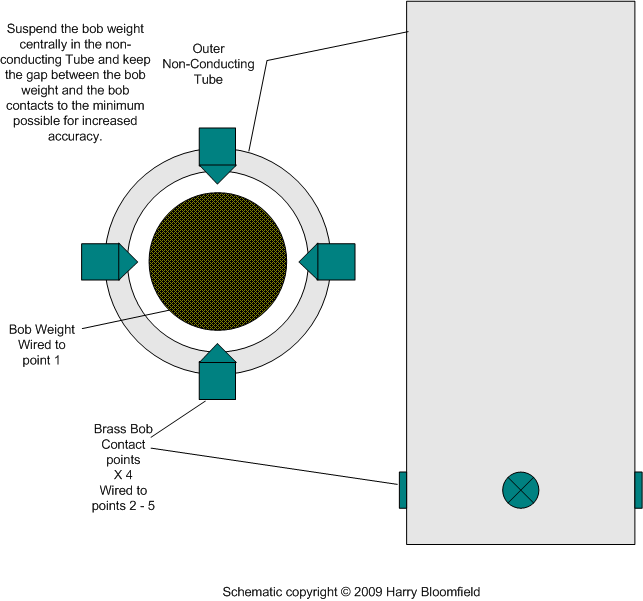
I used a 12" length of 32mm OD ordinary kitchen waste pipe, with a push fit coupler cut in half as a means to reinforce the bottom where the four pointed 4mm contact screws fit. I drilled undersize holes through the thickest part of the plastic coupler plus pipe and tapped them. Due to the nature of plastic, despite tapping it the screws will still be quite tight in the threads and stay put where they are set. I made a 25mm long by 25mm diameter bob weight with a 0.5mm hole through its centre. The hole permits a very flexible thin copper wire to be soldered to it, to act as the means to suspend the bob.
I found a plastic pop bottle top was a perfect fit for the top of the pipe and a tiny hole through the centre of this, allowed the wire to pass through it and down the outside of the pipe to a fifth bolt. This latter bolt was just fitted through the side of the pipe at about the mid point of the 12" length of the pipe to act as an anchor point for the suspension wire and a mounting point for the choc block, to link the sensor's 6 way ribbon cable to the display.
Once built, the four screws are adjusted to the point
where the gaps between the screws pointed tips are almost
touching the bob weight all around, with the bob weight in the
centre. Basically screw them in gently to the point where all four
LED's light, then ease them back out until only one LED is lit per
direction.
There is nothing at all critical about the need for sensor to be 12"
long. It just happens to be the size which would fit my own needs
for it to go under the bed.
The display.
For the display, I liberated a yellow plastic clam shell case, which had contained a set of precision screw drivers obtained from a Pound Shop. This was sprayed black, five 5mm hole drilled in it and the LED's installed. The LED's leads then formed a firm base onto which to solder the rest of the components. Once it has been tested, hot melt glue dribbled over the parts then keeps it all secure inside the case.
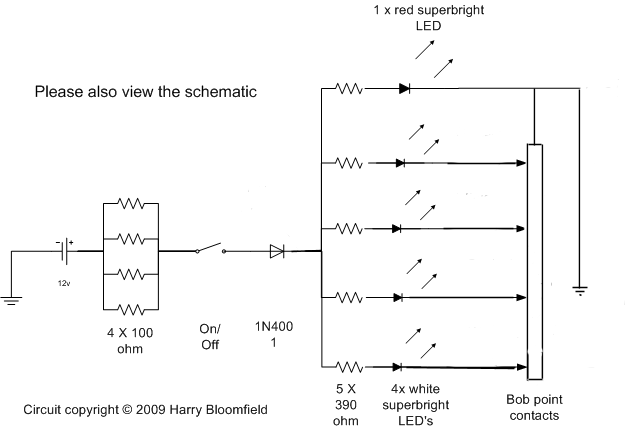
For the 12v supply a fused source should be found, or a fuse added - though the possible short circuit current is limited by the 4x (optional) parallel resistors.
Once built tested and working, the sensor can be installed in its chosen position. Mine was a tight push fit between floor and under bed support timber. To make it stay put I made two 2"x4"x1/4 ply with holes in their centre to fit each end of the pipe (not the same size due to the coupler), adding holes at either end for screws. I fixed the upper end first, got the caravan perfectly level in both directions, then watching the display get that to indicate level by adjusting the sensor carefully (see below).
In use, for instance to set the side to side level, you watch the LEFT and RIGHT LED's. The LEFT one lit means that the left side is high (high = light = lit). As this is adjusted, the two LED's will flash alternately, but not lit for equal time periods. The one which is lit more of the time is the high side. Once the period of both is about the same, the caravan is level. The very slightest of taps with a finger on the side of the caravan sets the bob weight rocking and LED's flashing. This unit is extremely sensitive, far more sensitive than might be needed and this should be kept in mind when leveling.
I originally thought that oxide build up on the brass of the bob weight and the contact screws might pose a problem, but giving this a little more thought - The movement of the caravan on the road will help keep these perfectly clean.
Schematic
Wiring Diagram and components.
Photos of construction
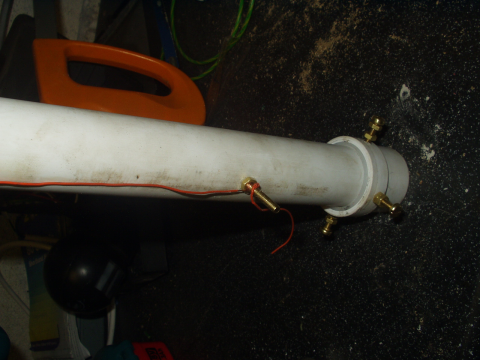
Showing the non-conductive tube and bob contacts.
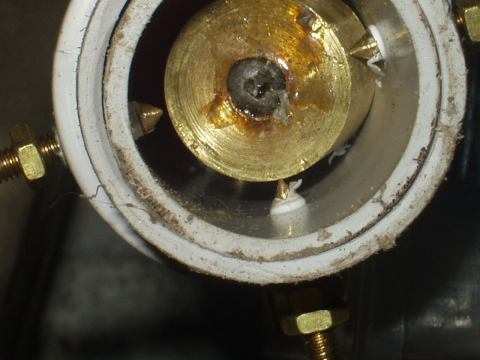
Showing the Bob weight and contact points.
Notes:
The 4 x 100 ohm resistors are there to prevent a short circuit blowing a fuse and the 1N4001 diode is to avoid the LED's being damaged by reverse polarity connection. Both of these are optional but recommended.
| Feedback | About |
 Follow this site on FaceBook